Frigging NOW.
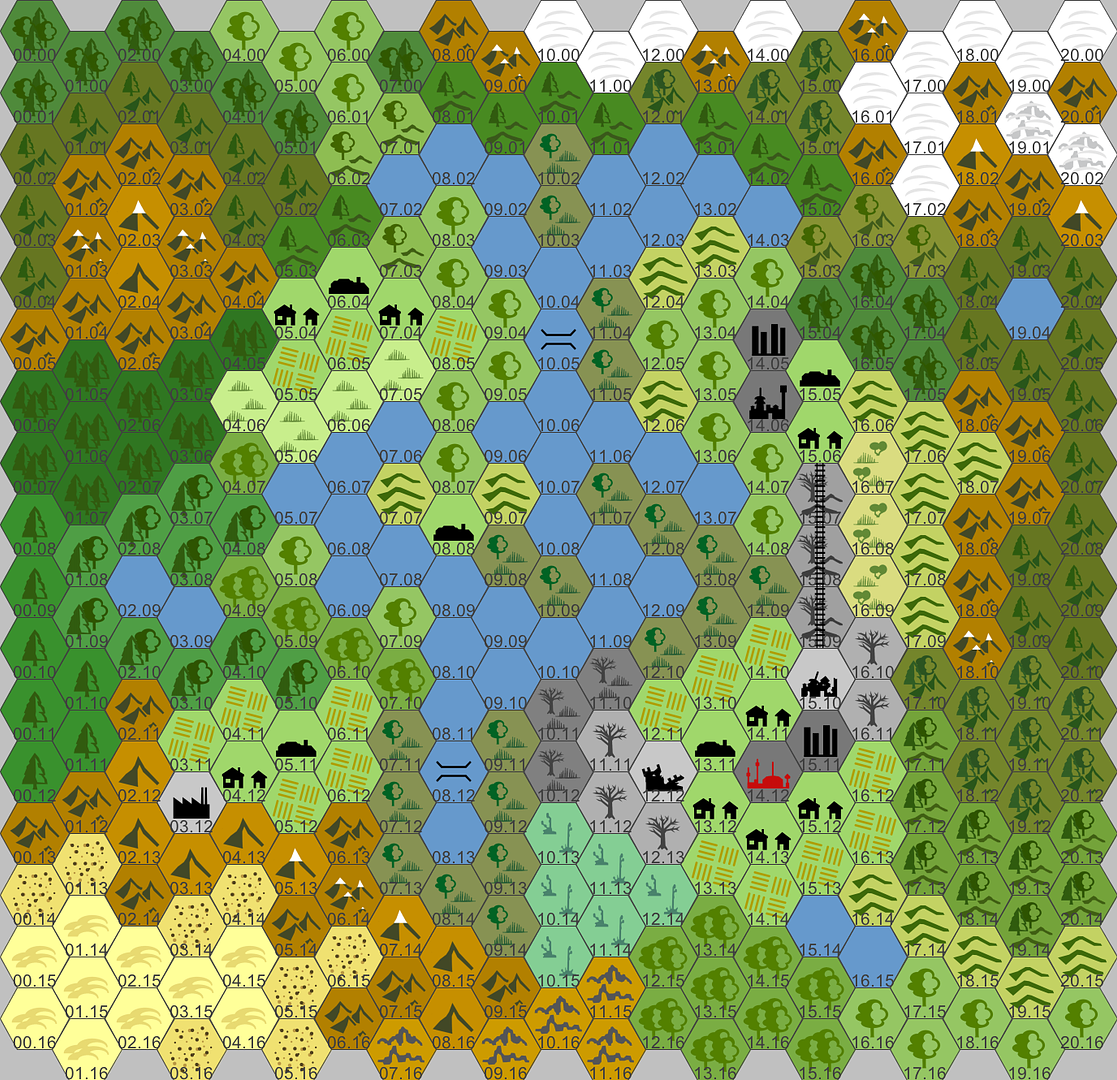
Each Hex represents 4 kilometers. Considering most tanks here have ranges of about 10 kilometers, we'll need to be within two hexes of one another for firing.
If there are any issues with that, bring them up. If not, we'll adjust if necessary later on. Being flexible and communicative is KEY here.
")
Icon Rundown:
1) Two little houses: Village
2) Rounded building: Also village/little town
^Think "quaint farming community" when you see these.
3) The Bar Graph looking thing: "Modern city"
More densely populated, urban.
4) The OTHER city looking thing, with the circle building: Same as 3)
5) Red City: Capital. Densely populated, heavy urban terrain.
6) The factory looking thing: A factory.
7) Hex #'s 15.10 and 12.12 are ruins of different kinds.
8) Hex #'s 10.05 and 08.12 are bridges. They allow one post crossing of water. Other crosses will take two posts.
Density of terrain: Basically, if there's ONE image in an icon, it's light terrain. If there's multiple, then it's heavy.
A single mountain is just that: A single mountain.
A group of mountains is a mountain range.
The major thing to keep in mind is how different terrain types will affect maneuvering and even optics. Swampy terrain will slow you down depending on your vehicle type. Repulsors will have the easiest time, walkers the next hardest, and tracked vehicles the utmost difficult.
If you're opponent is on high ground, they may be able to see everything you do, whereas you may not even be able to see them.
There's a rail road: This can be traveled in two posts.
Maneuvering:
COMBAT and NON-COMBAT
COMBAT maneuvers: 1 post = 1 hex.
NON-COMBAT maneuvers: 1 post = 2 hexes.
This allows us to maneuver faster across terrain when we're not engaging one another so we don't waste too much time describing the road trip to battle.
Similarly: If you disengage from combat to flee, you can cover two hexes with one post, but only if you're not trying to return fire.
Lastly, about firing and maneuvering:
Firing and maneuvering take place in different time spans. Maneuvering takes a while, whereas lining up your target and firing happens in seconds.
Thus, these will require separate posts, that way we cannot merely outmaneuver each other in mid-post/mid-fire.
Instead, line up your shot and fire only after your opponent has responded with their own maneuvers. That way, the position you last put your tank in is the position you're stuck in when your opponent pulls the trigger.
Any questions?
Oh, and starting positions:
Team 1: 04.00
Team 2: 20.15